Overview
Here is a brief overview of a very long article.
- An overview of my requirements for managing photos – Lightroom Classic CC is really the only piece of software meeting my requirements.
- Something about my folder structure.
- The initial setup and how to create the foundation of a good Lightroom library.
- How to compile all of your messy libraries of photos in a single Lightroom catalogue.
- How to clean-up – and how to delete 40-70% of your library.
- Having a continuous process for keeping your photo library up-to-date.
- Sharing selected photos with friends and family.
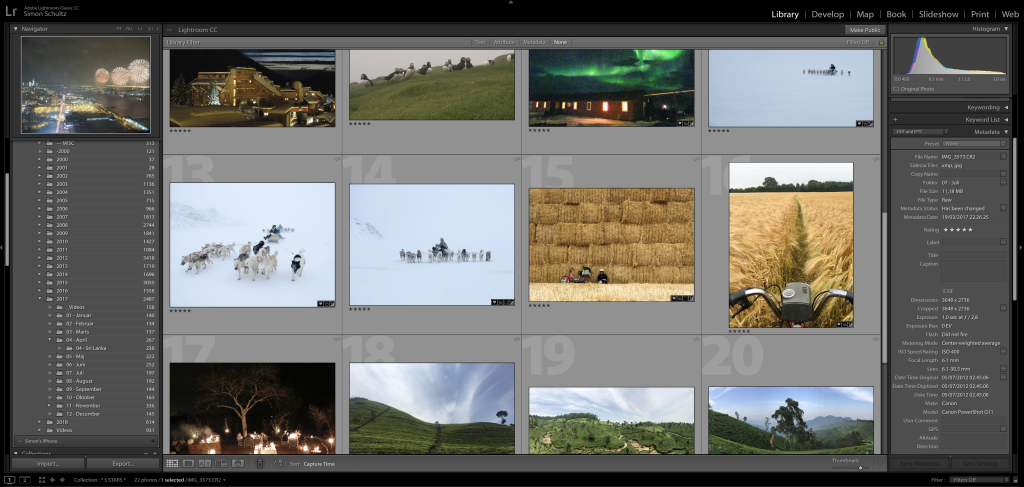
Background
I have shot 80.000+ photos since 2002 on multiple digital cameras. From my first couple of Canon IXUS cameras and the Nokia 7650 to my current setup:
- iPhone 6s
- Canon G16
- GoPro
- Canon 40D (yes, it’s old!)
I am no professionel and will not even call myself a photographer. And I used to be more interested in photography, but now just trying to catch memories and capture shots with a great composition.

I have gone from managing in folders to Picasa Web to iPhoto and the discontinued Aperture.I have been fairly on top of things, but always had bunch of redundant backups, duplicates and multiple different access points to specific photos depending on camera, year, event etc.
Two years ago I started digging into the details on finding the perfect setup for managing my photos based on the following requirements.
I (re)started my clean-up in October 2016 and was all done and up-to-speed in September 2017.
I probably shoot 6.000 to 8.000 photos per year, which now have been boiled down to 1.000 – 2.000 saved photos per year after the clean-up.
My Requirements
Having worked with different setups it was fairly easy to list my requirements:
- FILE STRUCTURE / FOLDERS I love the thought of all my photos being in a regular folder structure, that I myself control 100%. If shit hits the fan and software/platform X shuts down or slows development, I can always rely on old-fashioned folders.
Also, I am just really happy with the fact that software/platform X does not tamper too much with my files and folders. - COLLECTIONS / SMART FOLDERS / ALTERNATIVE CATEGORISATION On top of the underlying folder structure managed by the operating system I need some sore of smart folders and categorisation in order to collect photos across the OS folder structure.
- OFFLINE & CONTROL I am all pro Online-Cloud-Collaboration platforms, but I really want to control my photos 100% myself. It is one of the only few things I have with a sentimental value. Hence I prefer to have the files stored locally on *my* computer. And only online if I actively chose to do so.
- SIMPLE FEED FROM MOBILE Most of my pictures is shot on my phone. So managing my photos on desktop, would require a simple flow from mobile to desktop.
- FACE RECOGNITION I have loved the facial recognition in photos since it was launched by Picasa Web in October 2008. Also, I love sharing photos of friends with friends.
- GEO LOCATION I am triggered by maps. Seeing my photos plotted on a map is a requirement. And I need to be able to add/change GPS coordinates on all my old photos from cameras and phones without GPS.
- SHARING ONLINE I need to be able to share a folder as a (secret) link to a simple browser interface without too much of a hassle. If friends can download from this link it’s great. Then I don’t have to create separate ZIP-files.
- SIMPLE EDITING I don’t do tons of post-processing of each photo. But simple editing that still leaves a copy of the original photo behind is a requirement.
Choosing a platform
Having these requirements I only see Adobe Lightroom Classic CC as an option. Correct me if I am wrong.
Note: Adobe Lightroom was split into CC (Cloud) and Classic CC (desktop) while I was in the middle of my clean-up. Having the above requirements I still stick to Lightroom Classic CC and cannot see myself migrating to CC (Cloud) in the near future.
For a great comparison of Classic CC and CC, you can check out The Lightroom Queen or Photography Life.
You are probably in the following situation
I assume that you are in the same situation as I was:
- Shooting tons of photos on different cameras/phones.
- Photos collected in different libraries and structures.
- Duplicates of duplicates.
- Might have some sort of backup…. maybe!
- Having a desperate need to clean things up.
The Essentials
- Download and install Lightroom CC Classic and chose the best plan suited for you. I am happy with the small Photography Plan priced at US$9.99/mo including 20GB online storage.
- Get a plugin to find, manage and delete duplicates – there are a couple of good ones out there – so let me just suggest Duplicate Finder.
- Get two external disks for backup. Or use Crashplan/Drive/iCloud/Dropbox depending on your catalogue size and internet speed.
- A good solid computer. I am running on a fairly new 27″ iMac which makes everything a joy in terms of overview and speed. Less can do it, as long as you bear in mind, that requirements to your hardware increases as your collection grows.
The folder structure
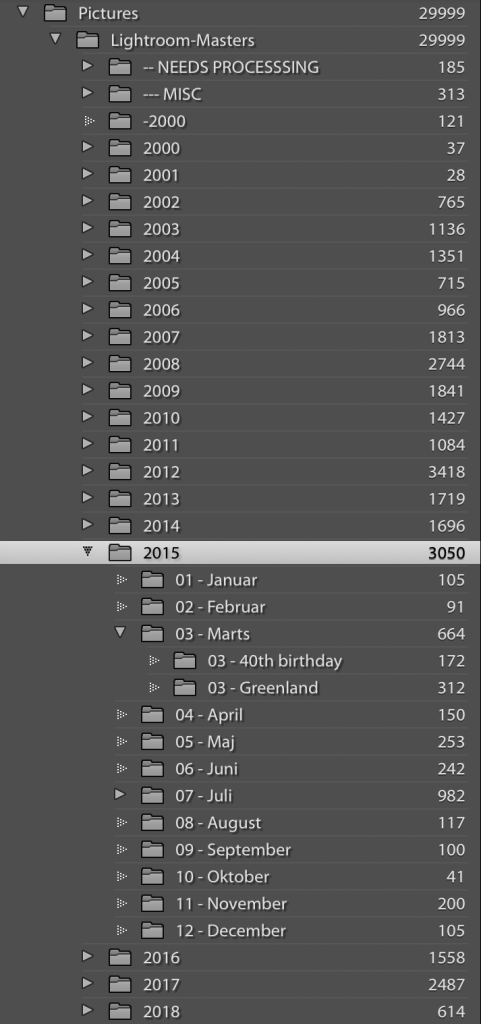
Within your single catalogue in Lightroom, you will need some sort of folder structure.
Folder structure is a matter of religion. Some more advanced Lightroom users state that keeping a year/month folder structure is redundant since Lightroom have these filters built-in.
I prefer a year/month folder structure – just because! And if Lightroom folds and the service/software is no longer available I will prefer a simple overview in a month/year structure.
“Needs processing” are photos which have not yet been pulled into the year/month folders. Some might need to have EXIF data/date changed before being blended with other photos in year/month folders.
I try not to add photos to “MISC”. But profile pictures, scanned postcards and other “dateless” photos belong here.
The initial setup
- Create a basic folder structure.
- Play around with files and folders before importing for real.
Having decided on your folder structure and having your backup and setup ready, you are ready to start importing from your different libraries, catalogues and folders.
Some libraries from eg. iPhoto can be imported, but you will also need to just import “raw” folders and single photos. Also note, that you might not be able to import all metadata from other libraries.
- Open your file manager (Finder on OSX) and create the following folders where you want to save your photos locally:
— Lightroom Library
—— LR Database
—— Photos (this is where your folder structure will reside) - Head back to Lightroom and create a New Catalogue (File > New Catalogue). Save in “LR Database folder”
- Now “Add Folder” – found in the “Folders” section in the left navigation. Find and add the “Photos” folder that you just created in step 1. You will now have 0 photos in this folder.
- You can now start creating some of your month/year/event folder structure within this folder.
Note, that these folders can be seen in you standard file manager as well. - Do a few tests importing photos and videos: File -> Import Photos and Video.
Also move files/folders around and check if the structure and folder content is reflected in your file manager as well. If that is the case – You are doing it right !
The initial messy compilation
- Place a copy of all sources in a single folder
- Import each source 1-by-1
- Run a plugin to identify/delete duplicates
- Sample check if everything has been imported
Initially you will probably have a bunch of different sources.
Place a *copy* of all these different sources in a single folder, so you know what to process. Backup that folder.
You should import all sources into Lightroom first. Secondly you will do the clean-up.
Do the following for each of your different sources:
- Go to File -> Import….
- Select the files/folders that you will be importing.
- Tick the box “Don’t Import Suspected Duplicates”, which will remove the most common duplicates.
- The choose “Add to Collection” – name a new collection after the source of your import. This will be great for cross checking samples.
- Your photos are now available from the left side navigation – just adding the folder source to Lightroom.
- Now move all photos from the original source into your designated Lightroom Folder which you created earlier. Put these photos in the “Needs processing” folder.
- When photos have been moved into the right folder, you can remove the original source folder from the Lightroom navigation to keep things simple.
- When moved to your “processing” folder you should run a duplicate check on the folder. The process depends on what plugin you will be using.
- Also, do a bunch of random sample checks to make sure, that your photos have been imported from the original source.
A tip to solve the mess
Tip: If your EXIF data is wrong in your photos (eg. time zones), you should change the EXIF data before importing into Lightroom. Alternatively, keep them in a separate folder within Lightroom, so you can change EXIF before mixing with the rest of the library.
Continue this process until all your sources have been imported into Lightroom.
Everything is probably a mess and all collected in one or several (sub)folders, that needs processing.
The Clean-Up
Now that everything is merged into one single catalogue and a limited amount of folders, it is time to tidy things up. It will be a lot of work, but a great walk down memory lane.
- Get things into the right folders
- Delete 40-60% of your photos
- Find and save 2-3 great memories from each month
- Add missing geo-location
- Tag faces
I will do a single month/larger events at a time, in order to not run the same tasks for too long.
Doing a single month also shows better progress.
Deleting photos
- Create a (sub)folder in your main library: Eg. /2008/*March/.
(I am adding a “*” in front of all months which still requires some sort of work. Eg. deletion or tagging faces). - Go to your “Needs Processing” folder where all your photos are located.
- Press “Metadata” and apply the filter to only show March 2008 photos.

- Select all photos (Ctrl+A) and drag these into your /2008/*March/ folder in the main catalogue.
- Go to that folder.
- Change your thumbnails size, so it shows 2-4 photos per row. Should be enough to reject photos.
(Alternatively, you can use the “Compare” tool by pressing “C”). - Now mark 40-60% of your photos for “rejection”. You don’t need 35 blurry photos from a random concert.
You mark photos for rejection by simply pressing “x” while on the photo you want to reject. - From time to time you should delete the rejected photos – Press Command + Backspace.
Remember to “Delete from Disk” and not only remove from you Lightroom Library. - When running through your photos one by one the following shortcuts will be helpful
Space – Show a single photo
g – Grid View
x – Mark for rejection
c – Compare photos side by side
Command + Backspace – Delete rejected photos
While running through your photos you should also select 2-3 photos as special memories. Add these to a separate collection called eg. “memories”.
Collections are groups of photos across your standard folder structure for easier access.
A random tip: Always check if the number of photos in each folder (months) reflects a reasonable number of photos. You might need to hunt for missing photos on old backup disks etc.
Adding Geo-location
Some photos from older cameras or offline phones might be missing geo-location.
- Select the Month-folder you are working in.
- Go to “Map” via the top right navigation.
- Make sure the “Filmstrip” is showing your photos below the map
- Select “Untagged” from the Location Filter just above the map. This will grey out already tagged photos.
- Use the Search Box to find your missing location.
- Drag one or more photos from the filmstrip t0 the location pin (orange) on the map.
- Continue until all photos are greyed out.
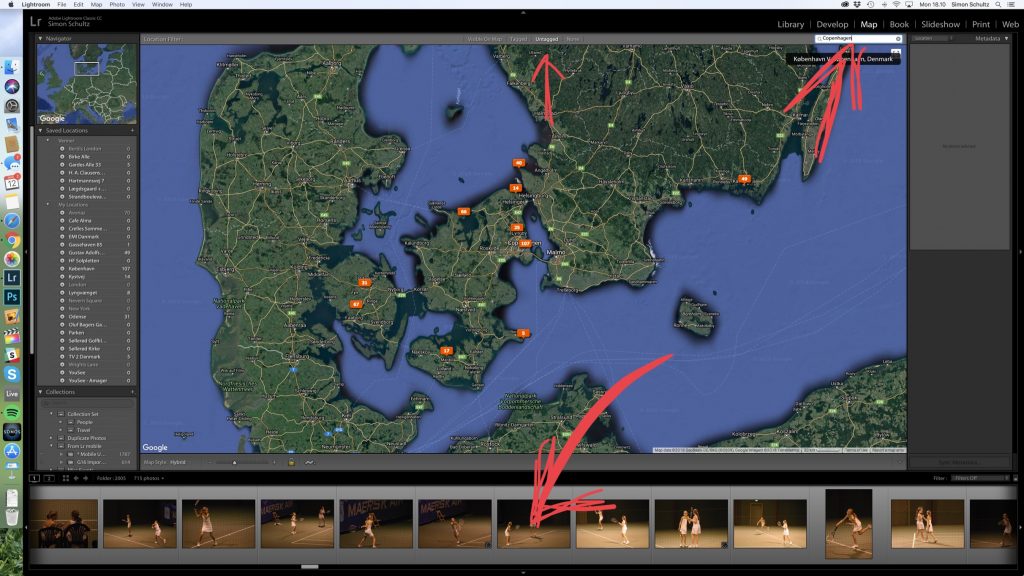
Pointing out the film strip, the search box and the “untagged” filter.
Tagging Faces
Next to categorising and deleting photos, tagging faces will be the most time-consuming task of your clean-up. But also most gratifying for you *and* your friends.
You should only tag faces in a given folder when you have deleted what should be deleted. Else you will do a bunch of work on photos you might delete later.
- Again, stay in the folder you are working in (eg. March 2008)
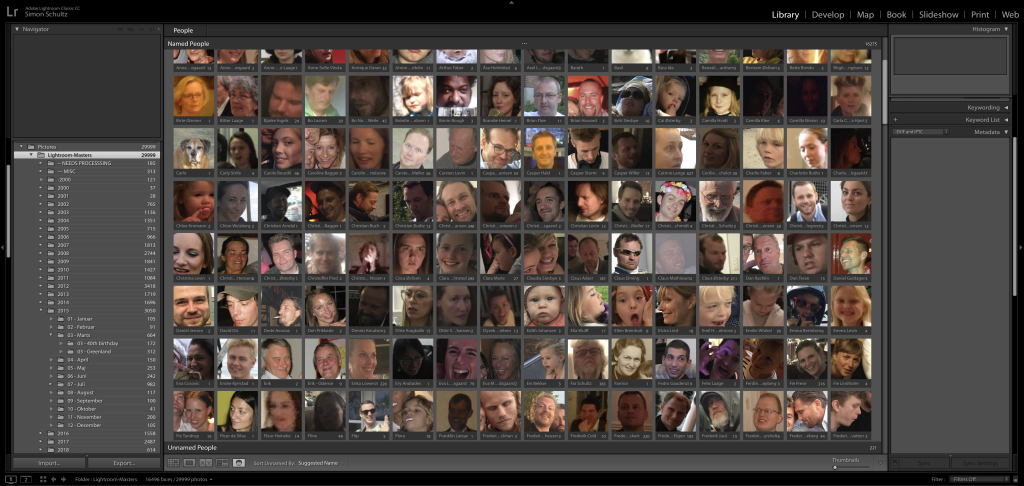
- Press “o” for Faces which will show you all tagged faces – Named or Unnamed.
- Start naming a few faces and Lightroom will learn.
- Apply full names – otherwise you will end up with 5 random Olivers who can’t be classified.
- You can mark multiple photos and apply the same name at once.
- Mark multiple photos of people you don’t know and press the “X” to reject.
- You should end up with a Face Library only having faces of “Named people”.
You can add “unfound” faces to photos via the toolbar on each photo.
Tagging faces is initially fun when Lightroom finds a bunch of photos of the people you know. The last 30-40% is hard work tagging single faces which have been categorised wrong by Lightroom.
The continuous process
When you are all set on your backlog of photos you should really keep up to speed on a monthly basis. It takes me 15-20 minutes to completely sort and tag a month of photos.
Import from misc cameras
I mainly use other cameras than my phone for vacation and events. When I am on vacation I do backups of the camera on my laptop.
When back home from vacations and events I just import directly from the memory card / camera and apply the same process as described above.
Import from mobile phone
For backup and synchronisation of my mobile phone, I use the Lightroom mobile application.
The mobile application syncs every new photo taken with my phone to the Creative Cloud immediately.
Whenever I open my Lightroom library on my iMac, the folder with my mobile photos are synced to my main catalogue. from here I will drag the photos to the given monthly folder and do the clean-up afterwards.
Adobe has a great description on how synchronisation between your main catalogue and mobile devices is working.
Something about Collections
As mentioned elsewhere Collections are groups of photos not depending on your main-structure of your photos.
All photos in a collection is just a virtual copy – meaning that you will not have any redundant copies of the same photo.
Your collections are the foundation of sharing online.
I use collections mainly for Vacations and Friends.
Also, I do run a couple of “Smart Collections”, which eg. collects all photos rated 5 stars or within a specified area.
Adobe has a great description of how Collections work.
Sharing Collections Online
The foundation of sharing online are the collections.
No collections. no sharing.
Unfortunately you can’t share “Smart Collections”.
I share a very limited number of my photos online.
For that purpose I have created 3 main folders for my collections in Lightroom:
- People
- Travelling
- Other
Whenever you want to share vacations, events, all faces of people etc. you need to create a separate collection for each of these.
Other than sharing it also just makes it easier to access specific photos.
Unfortunately (!), it is not possible to share Smart Collections, meaning that you will need to update your People folders manually for continuous update.
- Create a Collection with your friend’s name in the People Collection Folder
- Go to People Overview by pressing “o”.
- Choose your friend.
- Select all (confirmed) photos (CTRL+A)
- ⌘+N to create a new collection.
- Tick “Include selected photos”.
- You now have a collection of all photos of a specific friend.
Collections can be right-clicked and shared online easily. A couple of simple sharing settings are available.
After sharing the collections will be available on your Lightroom mobile application and via unique sharable links that won’t require logins etc.
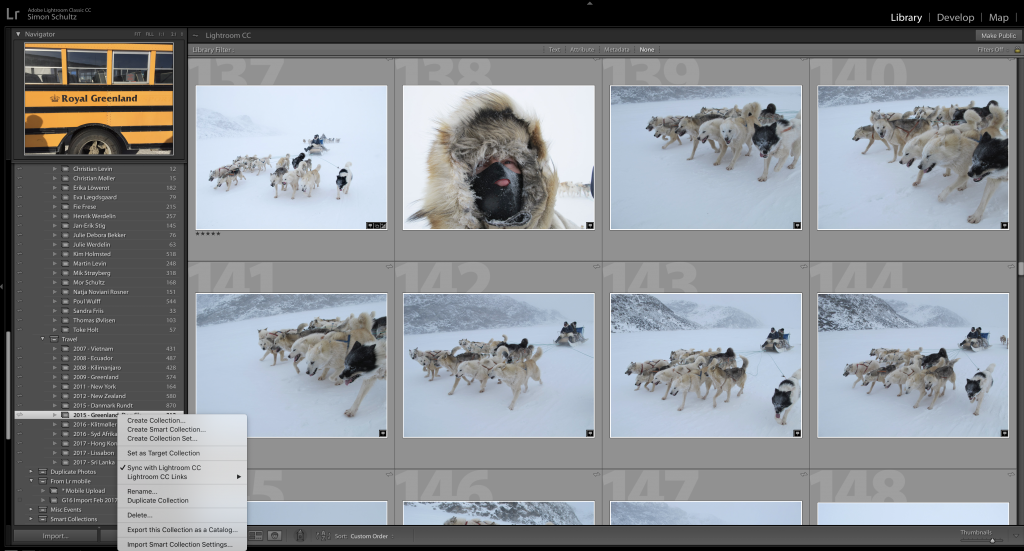
It is easy to share a collection online.
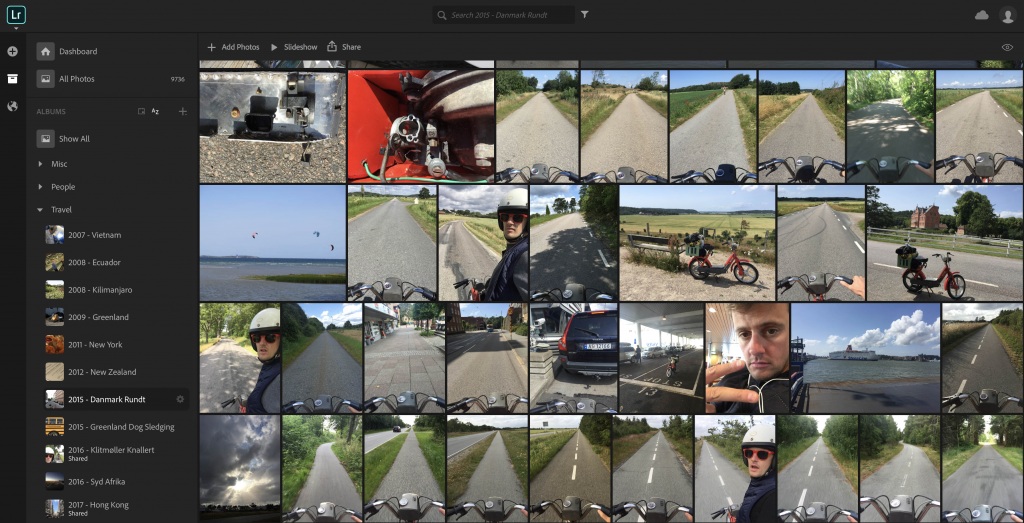
I really like the simplicity of the shared online collections.
Backup
Do regular backups. Seriously.
I run a weekly/monthly backup which is on a separate disk – hidden somewhere at home.
Once every (second) month this backup is also replicated to a second backup which I drop on another physical location for additional safety.
I think that’s it!
Hit me up on Twitter if you have any comments or questions 🙂
